Hello friends,
In this tutorial, I will show you how to control blinking speed of an LED using Arduino Nano & a variable resistor or a potentiometer aka the pot (short form of potentiometer).
This tutorial is similar to an LED blink code but, we added a pot to it, you may think that what is pot, basically pot is a type of resistor which value can be changed. It has three legs, 1 leg on each side which are rigid and are connected to each other with the small layer of conductor & 1 is in center which is movable means we can rotate it & it has a small pin which floats on this thin layer. For example, we connect GND to one leg & 5V to another leg, Now when we rotate the center pin to GND leg, the voltage passing through center will decrease & when we rotate it to 5V, the voltage passing through center pin will increase & if we rotate it to center the voltage will be half of the 5V, means 2.5V. understand !!
Now get back to our tutorial,
Things we will need :
- A Arduino board ( I took Nano).
- A LED
- A resister ( 150 ohm )
- A potentiometer ( yes, pot )
Step 1 : Wiring
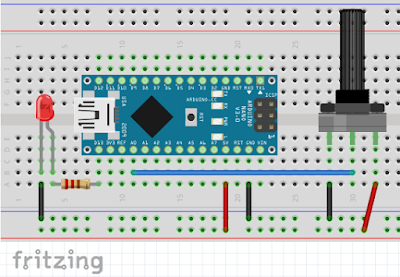
Firstly, place the Nano, an LED & resistor on the bread board.
- Now, connect the Nano's 5V & GND to breadboard's power lines.
- Connect one end of resistor to Nano's D13 pin & other end to an LED's anode pin or say long leg.
- connect cathode or short leg to the GND.
Now place the pot on breadboard.
- First leg of pot to GND.
- second to Nano's analog pin A0 &
- third to 5V.
Our wiring is now let's move to coding part.
Step 2 : Coding
Connect Nona to PC through the USB cable & open Arduino IDE.
Now go to File > Examples > Analog > AnalogInput. A sketch will open, upload it to the Nano.
when uploading is done, you can change the blinking speed of an LED with the pot.
Video tutorial :
How the code works.
You may remember, in an LED code, we took 1000 ms as delay between HIGH & LOW, means an LED remains 1 second HIGH & 1 second LOW. In this example, Arduino takes the voltage form the center leg of pot & converts it to digital form (0 - 5 to 0 - 1023). So, when we rotate the nob of the pot to 0V, we are actually decrease the time between HIGH & LOW & when we rotate the nob of the pot to 5V, we are actually increase the time between HIGH & LOW. Simple but effective way to control blinking speed of an LED.


This comment has been removed by a blog administrator.
ReplyDelete